Featured post

Build Alexa-enabled Apps

This is reference of my collection from different sources.

Image From Wikipedia

Skill to learn – 

Custom Slot Types
Writing Alexa Skills with Node.js
Deployment
Integrating Testing an Alexa Skill
Alexa Cards Interaction: displaying data on cards
Voice User Interface Design
Speech Synthesis Markup Language
Internet of Things Interaction
Account Linking
Skill Submission
Providing Updates
No preference

API to use for testing or for real  –  http://services.faa.gov/docs/services/

Useful links –

Developers Resources For ASK & AVS Developers

Training / Tutorials

Amazon Echo Dev Portal

Amazon Alexa Dev Portal

Amazon Web Services Events & Webinars Portal – subscribe via RSS to be notified of new events in your area(s) of interest

Udemy – Introduction to Voice Design with Amazon’s Alexa

Big Nerd Ranch – Alexa Skills Kit – course(s) not yet released, but you can sign up to be notified when available on the linked page

w3schools JSON Tutorial

Anythings Alexa Skills Kit Tutorial

ToBuildSomething’s Amazon Alexa Skills Kit SDK: The Ultimate Guide

Ruuvu: Building An Alexa Skill For IMDB Ratings With Alexa-app


ASK / Alexa Dev Communities

Amazon Developer Forum – Alexa Skills Kit

Amazon Developer Forum – Alexa Voice Service

Stack Overflow – Latest Alexa Skills Kit Questions

Stack Overflow – Latest Alexa Skills Questions

Stack Overflow: Latest Alexa Voice Service Questions

Seattle Area Meetup for Alexa Devs

NYC Area Meetup for Alexa Devs

Los Angeles Area Meetup for Alexa Devs

Boston Area Meetup for Alexa Devs

Columbus Area Meetup for Alexa Devs


Sample Code / Developer Toolkits

Matt Kruse’s Alexa App Node Module

Nicholas Clawson’s Alexa-bility Skills Framework For Node:
Interactive Demo
Documentation
Examples
Toolkit

Amazon’s Github Repository for Alexa Skills Kit Dev in Java

Amazon’s Github Repository for Alexa Skills Kit Dev in Javascript

Anjishnu’s Github Repository: Python ASK Developer Toolkit

Rocktavious’s Github Repository: Django ASK Developer Toolkit

stefann42’s Github Repository: .NET ASK Developer Toolkit

develpr’s Github Repository: Laravel & Lumen Classes to Make ASK Development Easier


Miscellaneous

Amazon’s Alexa Device Source Code Repository

MSDN Speech Synthesis Markup Language (SSML) Reference Library

JSON.org JSON Reference Library

Nodejs.org Node Reference Library

ASK Developer Wiki on Reddit

My own developer guide to Using Session Attributes in Javascript – free pdf, can be printed or downloaded

How To Check Amazon Server Status, Streaming Service Status

Amazon Alexa/Echo Team Twitter Account

Amazon Alexa Tech Business Developer Marion Desmazieres Twitter Account

Share

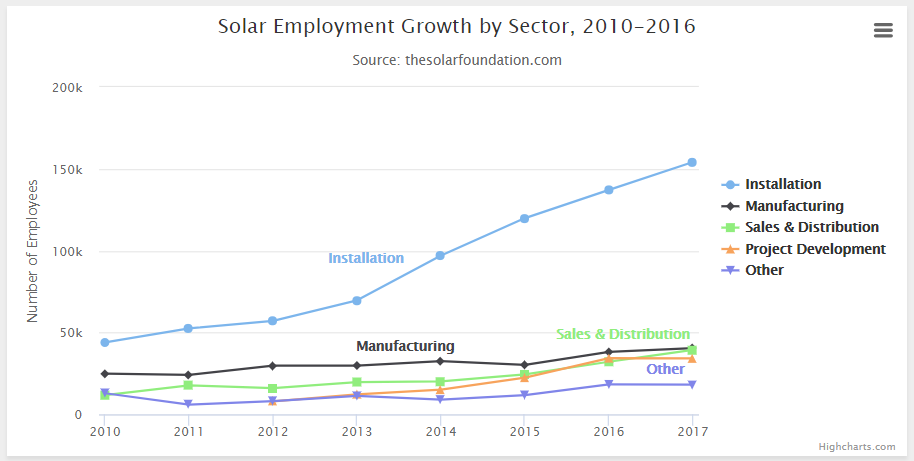
highcharts php array

https://www.freeformatter.com/json-formatter.html


$chart = '

  {
   "title": {
      "text": "Solar Employment Growth by Sector, 2010-2016"
   },
   "subtitle": {
      "text": "Source: thesolarfoundation.com"
   },
   "yAxis": {
      "title": {
         "text": "Number of Employees"
      }
   },
   "legend": {
      "layout": "vertical",
      "align": "right",
      "verticalAlign": "middle"
   },
   "plotOptions": {
      "series": {
         "label": {
            "connectorAllowed": false
         },
         "pointStart": 2010
      }
   },
   "series": [
      {
         "name": "Installation",
         "data": [
            43934,
            52503,
            57177,
            69658,
            97031,
            119931,
            137133,
            154175
         ]
      },
      {
         "name": "Manufacturing",
         "data": [
            24916,
            24064,
            29742,
            29851,
            32490,
            30282,
            38121,
            40434
         ]
      },
      {
         "name": "Sales & Distribution",
         "data": [
            11744,
            17722,
            16005,
            19771,
            20185,
            24377,
            32147,
            39387
         ]
      },
      {
         "name": "Project Development",
         "data": [
            null,
            null,
            7988,
            12169,
            15112,
            22452,
            34400,
            34227
         ]
      },
      {
         "name": "Other",
         "data": [
            12908,
            5948,
            8105,
            11248,
            8989,
            11816,
            18274,
            18111
         ]
      }
   ],
   "responsive": {
      "rules": [
         {
            "condition": {
               "maxWidth": 500
            },
            "chartOptions": {
               "legend": {
                  "layout": "horizontal",
                  "align": "center",
                  "verticalAlign": "bottom"
               }
            }
         }
      ]
   }
}
        ';

//$json = json_decode($chart, $assoc=true);
// echo '
';
   // var_export($json);
   // echo '

';
// exit();

Share

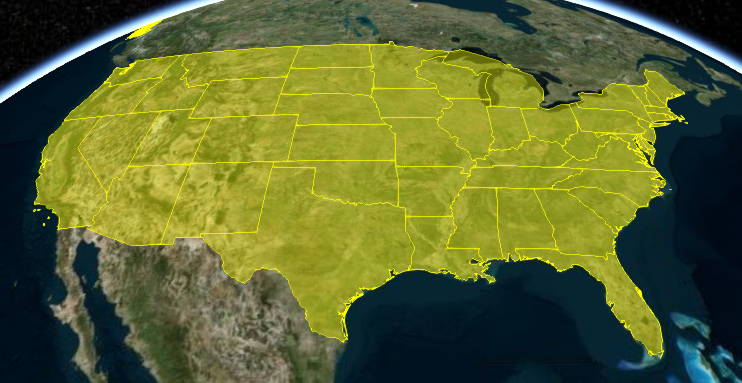
Remove GeoJSON datasource as well as entities

// 1. we can save the references to the entities that are labels in an array called 'labels'
var labels = [];


var promise = Cesium.GeoJsonDataSource.load('../../../cesiumLayers/sampledata/nextgen/World_Lables.geojson');
promise.then(function (dataSource) { 
    //viewer.dataSources.add(dataSource); 
    var entities = dataSource.entities.values; 

    for (var i = 0; i < entities.length; i++) { 
        var entity = entities[i]; 
        var abc = entity.position.getValue(); 
        var stPt = convertCartesianToCartographic(abc); 
        //entity.position = Cesium.Cartesian3.fromDegrees(stPt[0],stPt[1],stPt[2]); 

        // 2. Now, push each entity that's a label to our 'labels' array
        labels.push(viewer.entities.add({ 
            position: Cesium.Cartesian3.fromDegrees(stPt[0], stPt[1], stPt[2]), 
            label: { 
                text: entity.properties.name, 
                font: '16px Helvetica', 
                fillColor: Cesium.Color.WHITE, 
                outlineColor: Cesium.Color.BLACK, 
                outlineWidth: 5, 
                //pixelOffset : new Cartesian3(50.0, -50.0), 
                style: Cesium.LabelStyle.FILL_AND_OUTLINE, 
                translucencyByDistance: new Cesium.NearFarScalar(2.5e6, 1.0, 2.5e7, 0.0) 
            } 
        })); 
    } 
});

// some code later...

for (var i = 0; i < labels.length; i++) {
    // remove each entity that's a label
    viewer.entities.remove(labels[i]);
}
Share

cesiumjs – Removing Polyline


https://groups.google.com/forum/#!msg/cesium-dev/Bf9MwBgJN8w/5WfUFprBqSgJ

https://stackoverflow.com/questions/34450497/removing-polyline-in-cesium-js  Used

https://groups.google.com/forum/#!msg/cesium-dev/SLGGF3kpp_4/MvLRLVku42AJ

https://developers.google.com/web/fundamentals/primers/promises

Share

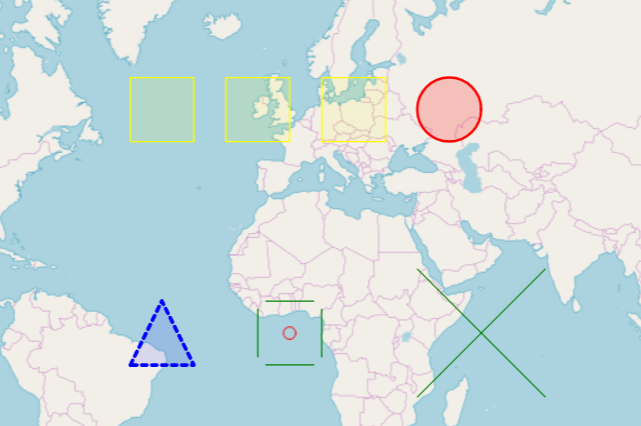
GeoJSON FeatureCollection example, geometry and properties.

        $str = '{
            "type": "FeatureCollection",
            "features": [
            {
                "type": "Feature",
                "geometry": {
                    "type": "Polygon",
                    "coordinates": [[[-69.0062266588211,
                    9.27562217679211],
                    [-43.517945408821106,
                    -2.811371193331128],
                    [-37.014039158821106,
                    -9.795677582829732],
                    [-72.61157142049046,
                    4.701436497353403],
                    [-69.0062266588211,
                    9.27562217679211]]]
                },
                "properties": {
                    "name": "DOUBLE OAKS CENTER",
                    "address": "1326 WOODWARD AV"
                }
            },
            {
                "type": "Feature",
                "geometry": {
                    "type": "Point",
                    "coordinates": [
                        -80.837753,
                        35.249801
                    ]
                },
                "properties": {
                    "name": "DOUBLE OAKS CENTER",
                    "address": "1326 WOODWARD AV"
                }
            }
            ]
        }';

http://openlayers.org/en/master/examples/geojson.html
https://google-developers.appspot.com/maps/documentation/utils/geojson/
http://geojsonlint.com/

https://gist.github.com/sgillies/1233327  –  The GeoJSON Format Specification

var viewer = new Cesium.Viewer('cesiumContainer', {
    sceneMode : Cesium.SceneMode.SCENE2D,
    timeline : false,
    animation : false
});

var dataSource = Cesium.GeoJsonDataSource.load('simplestyles.geojson');
viewer.dataSources.add(dataSource);
viewer.zoomTo(dataSource);

Share

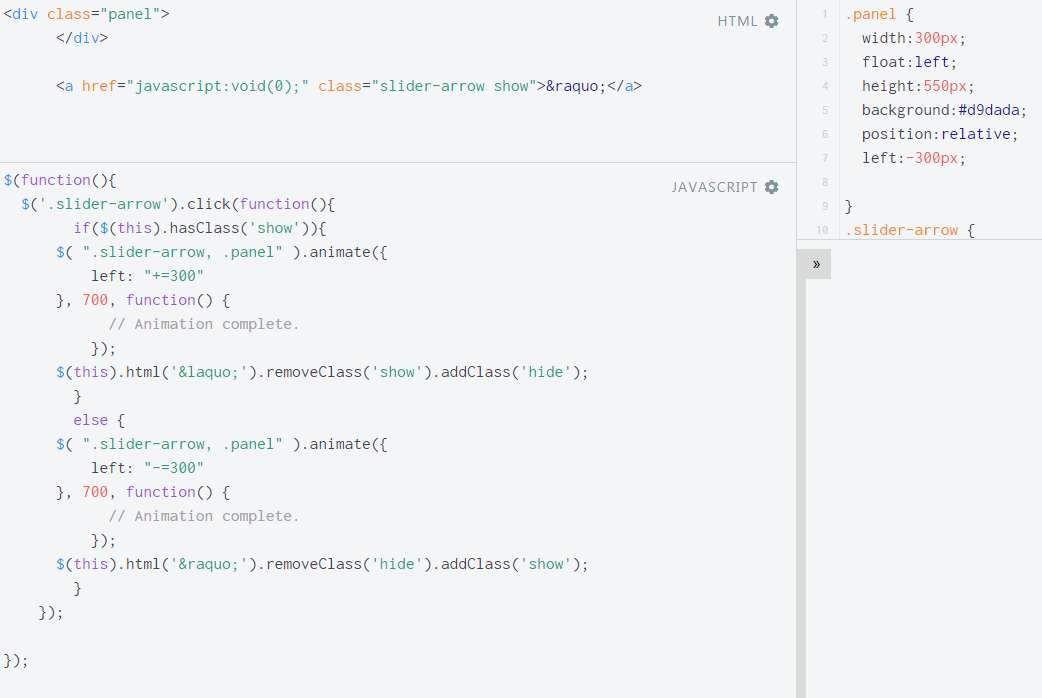
Left hand panel for Cesiumjs.


»
$(function(){
	$('.slider-arrow').click(function(){
        if($(this).hasClass('show')){
	    $( ".slider-arrow, .panel" ).animate({
          left: "+=300"
		  }, 700, function() {
            // Animation complete.
          });
		  $(this).html('«').removeClass('show').addClass('hide');
        }
        else {   	
	    $( ".slider-arrow, .panel" ).animate({
          left: "-=300"
		  }, 700, function() {
            // Animation complete.
          });
		  $(this).html('»').removeClass('hide').addClass('show');    
        }
    });

});
.panel {
	width:300px;
	float:left;
	height:550px;
	background:#d9dada;
	position:relative;
	left:-300px;

}
.slider-arrow {
	padding:5px;
	width:10px;
	float:left;
	background:#d9dada;
	font:400 12px Arial, Helvetica, sans-serif;
	color:#000;
	text-decoration:none;
	position:relative;
	left:-300px;
}

https://jsfiddle.net/phpmind/2gj84235/

Share

Displaying dynamic CZML data?

var czml = [{
    "id" : "document",
    "name" : "CZML Model",
    "version" : "1.0"
}, {
    "id" : "aircraft model",
    "name" : "Cesium Air",
    "position" : {
        "cartographicDegrees" : [-77, 37, 10000]
    },
    "model": {
        "gltf" : "../../SampleData/models/CesiumAir/Cesium_Air.glb",
        "scale" : 2.0,
        "minimumPixelSize": 128
    }
}];


var updatedCzml = [{
    "id":"document",
    "name":"CZML Model",
    "version":"1.0"
},{
    "id":"aircraft model",
    "position": {
        "cartographicDegrees":
        [-139.23640674352512,24.89787519772953,48897.796695947756]
    }
}];


var czmlStream = new Cesium.CzmlDataSource();


var viewer = new Cesium.Viewer('cesiumContainer', {
        infoBox : false,
        selectionIndicator : false,
        shadows : true,
        automaticallyTrackDataSourceClocks : false
});

viewer.dataSources.add(czmlStream.load(czml));


Sandcastle.addToolbarButton('Process', function() {
    czmlStream.process(updatedCzml);


});


https://www.html5rocks.com/en/tutorials/eventsource/basics/#toc-security

https://www.howopensource.com/2014/12/introduction-to-server-sent-events/

Source – Hannah Pinkos

Share

How to use CSS3 multiple columns properties

  • Multiple column As we know that text in columns is easier to read than the widespread long lines. Newspapers follow the rule of multi column layout because the lines are too long to read and understand. This property helps designers to give the look and feel of a newspaper columns with minimal coding.

    Browser support: IE 10+ and Opera.
    IE 9 and older versions doesn’t support this property.
    add -webkit- for safari and chrome.
    add -moz- for firefox.

    Lorem ipsum dolor sit amet, consectetur adipiscing elit. Integer semper nibh mauris, non consectetur justo gravida vitae. Proin sed feugiat erat. Praesent eleifend massa in tellus sagittis semper. Nulla tempor tincidunt nisl pharetra varius. Etiam vel sollicitudin quam, ac dictum dolor. Duis porta ultrices ante non aliquam. Fusce in dui quis massa laoreet posuere vitae et risus. Aenean convallis condimentum massa, eget aliquam velit.

    .multicolumn_layout
    {
    -moz-column-count:3; /*To support Firefox */
    -webkit-column-count:3; /*To support Chrome and Safari*/
    column-count:3;
    }
        
  • Column gap: Column gap property helps to provide space between the columns.
    Lorem ipsum dolor sit amet, consectetur adipiscing elit. Integer semper nibh mauris, non consectetur justo gravida vitae. Proin sed feugiat erat. Praesent eleifend massa in tellus sagittis semper. Nulla tempor tincidunt nisl pharetra varius. Etiam vel sollicitudin quam, ac dictum dolor. Duis porta ultrices ante non aliquam. Fusce in dui quis massa laoreet posuere vitae et risus. Aenean convallis condimentum massa, eget aliquam velit.
    Nulla tortor purus, accumsan in nulla in, feugiat gravida enim. Donec suscipit mi sed dui pulvinar, et imperdiet velit pretium. Nullam suscipit dictum nibh, quis ultricies sapien pulvinar quis.
    .column_gap{
    	-moz-column-count:3; /*To support Firefox */
    	-webkit-column-count:3; /*To support Chrome and Safari*/
    	column-count:3;
    	-moz-column-gap:30px; /*To support Firefox */
    	-webkit-column-gap:30px; /* To support Chrome and Safari */
    	column-gap:30px;
        }    
        
  • Column Rules: This CSS3 property helps to stylize the columns by providing width, style and color to the rule between columns. The rule will appear in between the column gap. This is the shorthand property for the column-rule-color, column-rule-style, and column-rule-width properties.
    phpmind-css3-multi-column-property

    Lorem ipsum dolor sit amet, consectetur adipiscing elit. Integer semper nibh mauris, non consectetur justo gravida vitae. Proin sed feugiat erat. Praesent eleifend massa in tellus sagittis semper. Nulla tempor tincidunt nisl pharetra varius. Etiam vel sollicitudin quam, ac dictum dolor. Duis porta ultrices ante non aliquam. Fusce in dui quis massa laoreet posuere vitae et risus. Aenean convallis condimentum massa, eget aliquam velit.
    Nulla tortor purus, accumsan in nulla in, feugiat gravida enim. Donec suscipit mi sed dui pulvinar, et imperdiet velit pretium. Nullam suscipit dictum nibh, quis ultricies sapien pulvinar quis.
       .column_rule{
    	-webkit-column-rule: 1px solid #CCCCCC; /*To support Chrome and Safari*/
    	-moz-column-rule: 1px solid #CCCCCC;/*To support Firefox */
    	column-rule: 1px solid #CCCCCC;
    	-moz-column-count:3; /*To support Firefox */
    	-webkit-column-count:3; /*To support Chrome and Safari*/
    	column-count:3;
    	}
       
  • Column width: Column width helps to declare the width of the column. Here it works similar to min-width property.

    For example: If our element’s width is 400px.The column gap is 20px and column width is 140px.
    400px – 20px =380px/140px = 2.7
    The browser can fit 2 columns by utilizing the space provided even if the column count is 3, as there is not enough space for a third column.

    Lorem ipsum dolor sit amet, consectetur adipiscing elit. Integer semper nibh mauris, non consectetur justo gravida vitae. Proin sed feugiat erat. Praesent eleifend massa in tellus sagittis semper. Nulla tempor tincidunt nisl pharetra varius. Etiam vel sollicitudin quam, ac dictum dolor. Duis porta ultrices ante non aliquam. Fusce in dui quis massa laoreet posuere vitae et risus. Aenean convallis condimentum massa, eget aliquam velit.
        .column_width{
    	column-width:140px;
    	-moz-column-width:140px; /*To support Firefox */
    	-webkit-column-width:140px; /*To support Safari and Chrome */
    	}
        
  • Column: This property is used to declare the number of columns and their width.
    phpmind-css3-multi-columns-property-eg

    Lorem ipsum dolor sit amet, consectetur adipiscing elit. Integer semper nibh mauris, non consectetur justo gravida vitae. Proin sed feugiat erat. Praesent eleifend massa in tellus sagittis semper. Nulla tempor tincidunt nisl pharetra varius. Etiam vel sollicitudin quam, ac dictum dolor. Duis porta ultrices ante non aliquam. Fusce in dui quis massa laoreet posuere vitae et risus. Aenean convallis condimentum massa, eget aliquam velit.
        .column_property{
    	columns:120px 3;
    	-webkit-columns:120px 3; /*To support Safari and Chrome */
    	-moz-columns:120px 3; /*To support Firefox */
    	border: 1px solid #d8d8d8;
    }
        
Share

Synchronous and Asynchronous

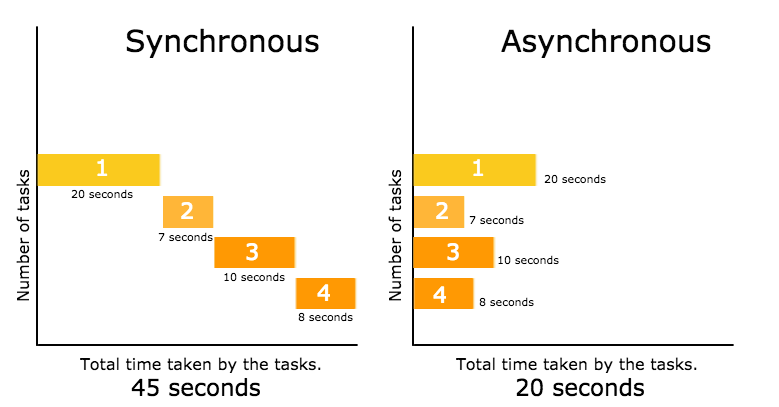
JavaScript itself is synchronous and single-threaded language. but you can write code in such a manner that function execution take a long time and can be interleaved with other operations.

First, let us use an analogy to understand Synchronous and Asynchronous.

Synchronous – You are in a Bus stop. When bus arrived, people will enter in a bus one by one. You cannot get into the bus until everybody in front of you gets in. and the same concept applies to the people standing behind you. This is Synchronous.

Executing something synchronously means, you wait for the task to finish before moving on to another task. Or we can say, two synchronous threads must be aware of one another, and one must execute in some way that is dependent on the other.

Asynchronous – Take household chores as an example. You put clothes to get washed and dry in a washer and dryer. Then you bake pizza in a oven. Meanwhile you are cutting veggies for salad. In this situation, couple of tasks are getting done at the same time. When the task is done. It will simply report back. This is asynchronous.

Executing something asynchronously means, you can move on to another task without waiting for the first task to get finished. The result of each task will be handled once the result is available. Or in other words, Asynchronous means two threads are totally independent, run parallely and neither one comes in each other way at the time of execution.

Try this code

// synchronous
console.log('First Task');
console.log('Second Task');
console.log('Third Task');

Output will be :-

First Task
Second Task
Third Task

The output will be First Task, Second Task, Third Task. As javascript execute one function at a time and will wait for the function to be done before moving to the “Second Task”

Now try this code. I am using setTimeOut method here. The function will be processed in the background, while your program is doing other things.

// asynchronous
console.log('First Task');
setTimeout(function(){
   console.log('Second Task');
}, 2000); 

console.log('Third Task');

Output will be :-

First Task
Third Task
Second Task

The setTimeout() method calls a function or evaluates an expression after a specified number of milliseconds. The setTimeout() method is asynchronous as it breaks the synchronous flow. This trick is used to execute the code after stacked events and fix timing-related problems.

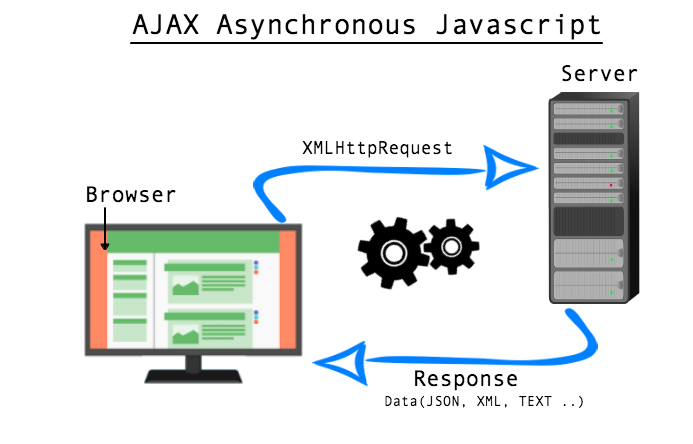
AJAX (Asynchronous JavaScript and XML) requests are by default asynchronous, The XMLHttpRequest object is used to exchange data with a server behind the scenes. When the browser makes server requests. The response could take a little time. So you set up a function that will wait for the response to be sent back by the server, and react to it once the response is available. This whole process does not comes in the way of other functions.

  var xhttp;
      if (window.XMLHttpRequest) {
        // code for modern browsers
        xhttp = new XMLHttpRequest();
      } else {
        // code for old browsers (IE6, IE5)
        xhttp = new ActiveXObject("Microsoft.XMLHTTP");
      }
      xhttp.onreadystatechange = function() {
        if (this.readyState == 4 && this.status == 200) {
          document.getElementById("ajax_demo").innerHTML = this.responseText;
        }
      };
      xhttp.open("GET", "fruits.txt", true);
      xhttp.send();
      xhttp.onload = function(){
        document.write(this.response);
      }; 
Share

Understanding Javascript Closure

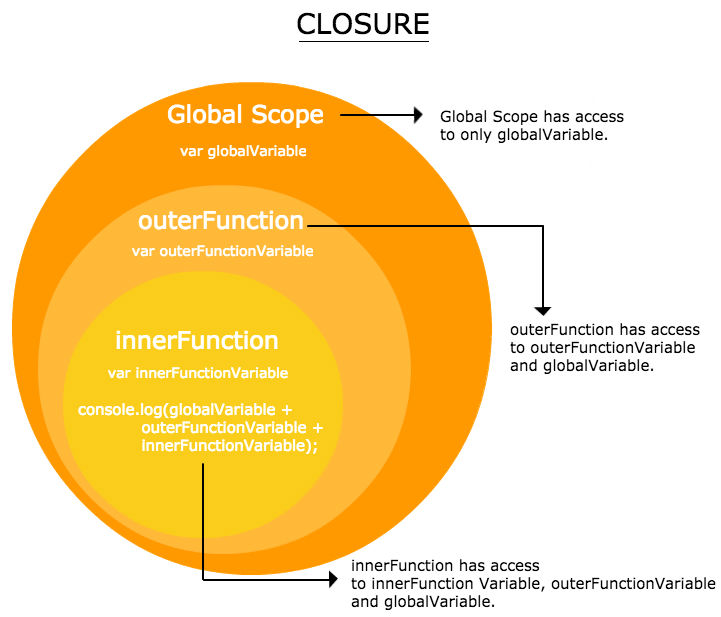
Closure is a nested function that has access to the variables in the outer (enclosing) function’s scope chain. It has access to variables in three scopes:

  • Variable in its own scope.
  • Variables in the enclosing (outer) function’s scope.
  • Global variables.

var globalVariable = 'Global variable.';

function outerFunction() {
  var outerFunctionVariable = 'Outer function variable.';
  
  function innerFunction () {
    var innerFunctionVariable = 'Inner function variable.';
    console.log("This is " + innerFunctionVariable);
    console.log("I can also access " + outerFunctionVariable);
    console.log("This is a " + globalVariable);
  };
  innerFunction();
};
outerFunction();

Best part of closure is that the nested (inner) function can access the variables from the outer scope even after the outer function has returned.

function myFunction(x) {
    var outerVariable = x;
    return function() {
        console.log(outerVariable);
    };
};

var secondFunction = myFunction("This is outer variable");
secondFunction();
Share